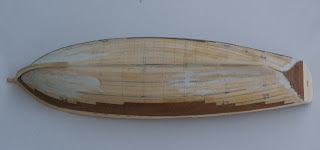
With the upper stern and bulwarks in place, it was time to start the second  planking of the hull. We measured the width of the planking in various places along the hull with a piece of paper held against the surface of the first planking. This indicated about 15 levels of planking at mid-ship with full widths of the 5 mm strips. Using dividers, we divided the various points along the hull into 15 equal sections and then drew lines along the hull for reference during the planking. This allowed us to more easily keep up with how much to taper the planks toward the stem and stern during the planking.
As with the deck, we decided to plank with strips 50 mm in length in a 1-2-4-3 sequence and this time we used CA glue to attach the new planks against the first layer. Super glue dries very fast, in just seconds, which has its advantages and disadvantages. You can work real fast, but you will also often glue fingers to the hull. The middle third of the hull would all be full width strips but we would then taper the strips slightly toward the stem and stern to a strip width of about 3-4 mm. The first two levels below the bulwarks were planked full width from stem to stern. This was in anticipation to the rubbing strakes being later attached to this upper area, and we wanted to have the visible upper plank and rubbing strakes parallel the entire length of the ship.
This was where it was very handy to have four hands. I do not know how  anyone alone can plank a hull using superglue, bending the planks against the previously installed level and keeping from crushing the bulwarks and stern at the same time. The two of us were able to accomplish the planking in a methodical manner with little difficulty, with me applying the glue to the hull and then holding the ship while Caroline applied the plank and bent and held it in place for the few seconds it took to dry. We both had to use finger nail polish remover on our fingers after each planking session to remove super glue.
After planking the first two levels, we planked the stern, which looked  good enough below the lined upper stern to encourage us. We carefully trimmed the access within about a half mm and then used sanding files to finish the shape.
We alternated laying the planks port and starboard and closely monitored the  progress down the hull. The layers stayed surprisingly even, from stem to stern, all the way to the keel.
We were concerned with how the forward planks were going to  meet with the stem. We had seen plenty of pictures of completed ships, with this looking great on all of them, but we were still not sure how we were going to pull it off. We decided we would need to build up and reinforce the bow area with more putty. The stem was temporarily fitted in place during the planking but would need to be removed for sanding the final planks.
At each level of planking, when we came to the final plank to meet the  stem at the bow, we cut the plank to fit and sanded the plank to a wedge to fit tightly against the stem.
As we progressed down the hull, we found that there were gaps being  left at the bow between the initial planking and the final planks.
These would need to be reinforced to keep from breaking the sharp pointed  planks during sanding. As you can see, the gaps were sometimes significant when we removed the stem.
We filled the gaps with our Squadron MMD White Putty, applying it and  poking it under the planks with a toothpick. This stuff dries quickly and is very easy to sand.
We kept sliding the stem in to make sure it would fit after everything  was dry.
The stern was done differently. After much discussion and test fitting, we  decided to sand the stern planks flush to mount the sternpost later.
On the keel, we made a transition from the keel lying between the outer planks  toward the bow to lying against the planks on the stern. I’m sure that a real ship isn’t made this way, but it was a much easier way to do it for us at this stage and we were worried we might mess it up any other way. I found a rough nail file the width of the stem, keel, and sternpost and we used this to sand the grove for the keel.
We used this same file to carefully even up the grove at the bow for the  stem.
stem.
Next we will attach the rubbing strakes and the stringers and railings.


